Nov 3, 2015

Oh my goodness, where did October go!?

Well, I will tell you where... It went to moving and pneumonia and not having internet, which I still only have in spurts. Ive been getting kids through exams, buying things for the new house and trying to get my craft space up and running. That has been more difficult then I thought!

I have been posting here and there on different blogs, so I thought I would stop in here to share with you while I do actually have internet working. Have you ever been told by your provider that it would take 2 months to get fiber installed!? Come on Singapore, what gives?!
ok.. enough of that stuff. lets get on to the goods!

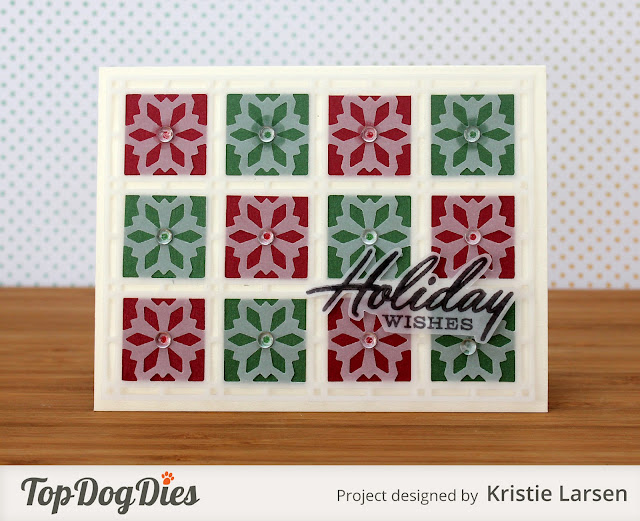
Here is my card for this week over at Top Dog Dies. I used some gorgeous glitter paper form CutCardStock.com as well. They are having a sale on red, white and green card stock right now. So don't forget to head over to do some pre-holiday shopping! ALSO they are having a DESIGN TEAM call there too. Be sure to check the blog for all the details.

I started with die cutting the Snowflake Mosaic out of vellum and measuring the individual snowflake block which is 1 inch.


Next I took my gorgeous Curious Metallic card stock and trimmed them down to 1 inch squares and adhered them onto the back of the vellum die cut.

I then adhered the entire thing onto the front of a cream Curious Metallic card stock base and fussy cut a sentiment from vellum as well.

I added some rainstones for a finishing touch to each snowflake.


And that's it! A fairly easy card to put together but the Snowflake Mosaic gives it some real beauty! You can check out the last release from Top Dog Die cuts at their website too. Some really fun things to shop for! I will be back... when my internet will let me and share more of their holiday release.
Thanks for joining me today. Hope you have a great week!
xoxo
k

Sep 26, 2015

Avery Elle Inks and A Walk Down Memory Lane blog

Hey there! Just popping in before the weekend... I'm over at A Walk Down Memory Lane blog today. I'm sharing a little review on Avery Elle pigment inks. I got to try them out and wanted to share with you!


The stamped results are pretty great... I am definitely a fan! Also on the docket, new My Favorite Things stamps are in the AWDML store! YES!

Thanks for stopping in today. I am in the process of packing up my life and moving house in the next two weeks. It's going to get crazy over here, but I promise I will be back...eventually!
xoxo
k

Sep 22, 2015

Top Dog Dies Leaf Mosaic die cut

Hello there! I'm sharing this NEW gorgeous die cut with you today from Top Dog Dies september release. It's a full size A2 die cut and has lovely details. 


I made a fast and simple card but the die cut is so stunning that it looks hard to make. But it wasn't. I watercolored some paper in fall colours and then die cut it out. So simple.

I added a sentiment strip made with some vellum and adhered it along the back. I popped up the die cut with some foam adhesive to help give it more dimension. I also added it to a beautiful card base from CutCardStock.com using their Curious Metallic card stock. It's some of my favorite card stock!

Ok, that's it for me today! Happy happy tuesday!
xoxo
k

Sep 19, 2015

MFT Card Design Superstar Contest!

I've been trying and trying to get my act together to join the MFT contest that is ending in one day! I ordered some new MFT products (holy cow, they are awesome!) I have visitors in town and I'm in the process of moving, plus my regularly scheduled card making responsibilities still need to be seen to. Needless to say its been hard to find some time, but I did it! I actually completed a card! Only one, but still... I'm not going to let that get me down cause I got it done. And now I have proof in a photo!

I started with using the new Brick Wall Cover-up and die cut it out of two different colours of brown card stock. I stamped over the orangeish color with a background stamp and then glued them all back together over a card stock base. I then die cut the front of the card twice with the new Stitched Interactive window. Which I love!

Inside I built a little scene using the London Mouse collection (stamps and matching dies). This set! OH! It just steals my heart. I made a little collage. I did some layering with foam adhesive as well.

You can see here from the front, my little bear poking out. I love his face.

 And here is the front with a few flaps open.

The ending challenge was to get good photos without my external flash (I'm out of batteries) and while its pitch black outside (it's midnight here!) But it worked out. And now I must go to bed.


That's it! If you are interested in checking out the challenge be sure to click HERE. There is one day left!! I am thinking regardless of what happens, I'm a superstar for even getting it done. Jill Dewey Hawkins... this one is for you ;)

xoxo
k

Aug 28, 2015

A Walk Down Memory Lane and Penny Black

Hey there! I'm over on the A Walk Down Memory Lane blog today. It's my first time trying out some Penny Black stamps and I love them!


It's been a crazy few days and I'm looking forward to the weekend. Which is saying something because usually a weekend looks like a small apartment with 4 fighting boys and it is less then fun. But we could use a break from the routine and we are looking forward to some pool time and family time. Also, I wouldn't mind some more sleeping time, if you know what I mean ;)

I hope you have a great weekend! Thanks for stopping in.
xoxo
k

Aug 25, 2015

Top Dog Die tags

Hello there! Today I am over at Top Dog Dies blog sharing a little fun with tags!
These use the Top Dog Dies Gift Tag die cut (TC078). And it couldn’t be more easy to whip up some tags for gifts for those you love!


I started with some coloured card stock for the background (or bigger die cut) and then white for the tops. I also die cut the words To and From out of the white layer. I taped them together so I could easily move them from tag to tag.


Then it was just a matter of stamping some images and adding color, or stamping IN color! Easy as can be! 


I also added some Wink of Stella to each tag (which is kind of hard to see here) and then finished them off with some twine from my stash) 


These came together so fast. You could easily make some up for Christmas, birthdays, or any other holiday of the year! You won’t lose much time in your life when crafting with these Top Dog Dies. And you know I love that!


Thanks for joining me today! Hope you have a good one and find some good crafting time for yourself this week!
until next time
xoxo
k

Aug 21, 2015

A Walk Down Memory Lane and Decorated Borders

Hey there! join me today over at A Walk Down Memory Lane blog for some decorated borders on cards. A simple and easy technique but fun enough to add some oomph to your designs.
Head on over!!  


Have a great weekend! My kids have been out of school the last two days so I'm starting down the barrel of the weekend with a little bit of anxiety. More free time means in my house MORE fighting! AH! Please tell me this too shall pass! Love that I get to craft and meet you all out here in crafty friend land. It keeps me sane!
Thanks for stopping by today
xoxo
k

Aug 20, 2015

Freshly Made Sketches #200 Celebration!!

Hello there! Today marks a celebration over at Freshly Made Sketches and Top Dog Dies is a sponsor in a GREAT big giveaway! Check it out HERE

I'm sharing a card as a Top Dog Dies design team member. Here is the sketch:


Here is my card. 

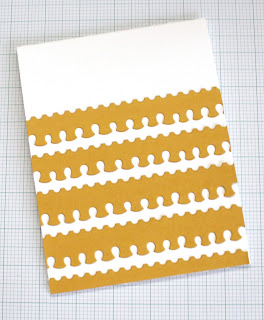
I don't know about you, but when I get new die cuts, I keep them in tact and cut them apart only as I use them. This particular set is the NEW released (this month!) Borders #1 Die Cut set. I had used one of the three for this card, but had these other two still attached together. So I laid it out on some golden card stock and die cut it multiple times. But not all the way. I kept both ends still uncut so it wouldn't fall apart on me. 

Then I trimmed out the part I didn't want and glued down the rest to my card front. In contrasting colours I die cut the same borders so I could sandwich them into the front.

Here you can see I inlaid them into the gold card stock and added a die cut sentiment also from Top Dog Dies. And you never can go wrong without some enamel dots. Am I right? Man you should see my stash of those things. It's crazy!

And that's it. All done! I love the die cut inlay technique. It takes some time, but the results are so fun (and so smooth!)

Thanks for stopping in today. Make sure you run over to Freshly Made Sketches and try it out yourself. Be sure to join in the contest there is SO much to be won! 
until next time,
xo
k

Aug 19, 2015

Top Dog Die Post: Quick Fall Notecards!

Hello there! I'm sharing this weeks Top Dog Die post. I wanted something fast. Can you sympathise? School is getting back in session, shopping needs to be done, Back to School nights need to be attended and finishing up any last moment 'summer-time flings' need to be squeezed in. There isn't a lot of crafting time! So when that happens to me, Top Dog Die cuts are the best way to get 'er done!

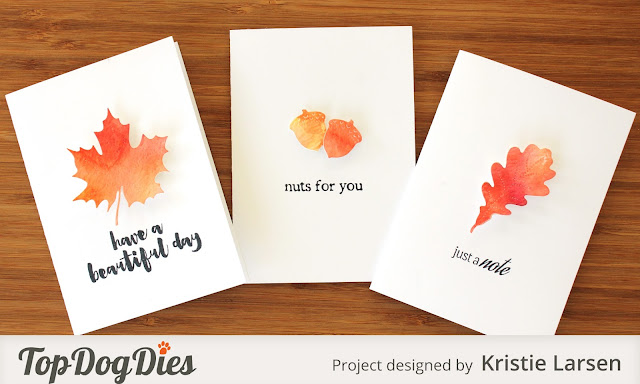
I made up three notecards in to time flat.


I started by doing a quick water-colour wash using my Gansai watercolors from CutCardStock.com. I used some fall colours to go with the Fall Foliage die cuts from Top Dog Dies

This took a matter of 5 minutes from start to finish and then I die cut out a few of each item. (quicker if you use your heat gun for drying) I then took some pre-scored A1 sized notecards from CutCardStock.com and adhered the items on, and stamped a sentiment. POOF! All done! This is a fast card you can make up if you have to run dinner over to a friend.

Or maybe you have THAT many zuchinni's in your garden and you just can't. eat. more! Whip up this real fast and put it in a care basket for your neighbours.

Or maybe it's the first day of school and you totally forgot to think about that new teacher who might need to know you have her back all year, when it comes to your child... quick notecard and a 'thank you' to her all done before the kids can run out the door ;)


See! You always need a fast and furious 'go-to' in times of need. So my advise? Add some pre-folded notecards to your stash and get a few new Top Dog Die sets and you are all ready for those crafting times when you are in a real pinch. It will save yourself some time!

Thanks for joining me today.  Hope you have a great week!
xoxo
k

Aug 8, 2015

Top Dog Dies August Release!

Hello there! It's a big post for you today to share with you some fun cards using the new August Release for Top Dog Dies! YAY! Release day is always the best. You can find the new dies in the STORE now.

I wanted to share with you some cards first using the balloon die cuts. This set is fun because there are SO many different sizes of balloons! This one uses the medium sized balloons. I die cut two of each size. One in striped coloured vellum and then I layered under it some polka dotted vellum


I love the three different sizes and thought it would be perfect for a baby card!

Next up I used the border die cuts in a little bit of a different way.

I die cut about 5 strips of four different colors (included a shiny silver paper) and adhered them in a variety of angles. Stamped and trimmed out my vellum sentiment and added some enamel dots.
 Next up this CUTE cupcake die cut set with a little plate. I love this set! Such cute details to choose from.


I actually took the biggest balloon die cut and used it to trim out the background circles. I just cut off the extra little balloon opening and suddenly had these lovely half circles to work with. I love double use out of die cuts!

This card is done in the same manner as above. I just wanted to try it with some vellum. I took the biggest balloon die cut and trimmed off the excess and overlapped them for my background.

Then stamped onto another piece of vellum and layered it all over top with some enamel dots.

Ok, almost done! This one is a fun one because I took the rainbow die cut set and embossed some cotton paper to create some scallops. I watercolored them and trimmed them out. If you look closely you can tell that it is the rainbow die cut!


 I added some polka dot vellum (you know I LOOOOVE vellum, right?!) And added some twine and sequins to finish it off. I love the look of water-colour over the embossing. Creates lovely shadows and patterns.

Ok, and very last, I wanted to use these set as intended so I created a few curves of rainbow with some overlapping of colours and cut out a plethora of clouds in grey, white and patterned, yup you guessed it, Vellum! 

I fussy cut out the banner from the stamp set I used and coloured it with some Copics to help it pop a bit. It was all adhered with some rainstones to a white card stock base.

And that's it! All things are ready for you to head over and shop! I hope you found some interesting things here and are excited as I am about the new release! Thanks so much for stopping in today. Hope you have a good one!!

xoxo
k

Aug 5, 2015

Back to school with CutCardStock.com

Hello there! I am over at CutCardStock.com blog today sharing a very fast and fun tutorial for back-to-school.

Check it out!
You can JUMP to the post by clicking HERE and then be sure to check out the store for a sale on all Esse card stock.

Have a great day!!
xoxo
k

Aug 1, 2015

Embossing powder + Stamps!

Hello there Sweet fans! It's Kristie Larsen here to share a fun little tutorial that involves embossing powder and some Sweet stamps

First, here is my card. I created a big gold emblem for the front of my card. Let me show you what I did so you can create your own!


First I started by using the fun California Lovin' stamp set. I randomly stamped the state all across my card stock panel.
Next I took the big GOLDEN sentiment and measured it onto a scrap piece of card stock to make a mask. I wrote right on the paper to measure how big I wanted it. I didn't want it too big or it would cover up all my background stamping. You definitely want to use card stock. Thicker masks for this technique work best. 


 I took a die cut and partially cut one side and then the other to create my own style of mask. I did this because I wanted it to be a specific size and I didn't have a die cut that was perfect. That's the great thing, you can alway make your supplies do what you want! You just have to get creative.

Ok, here is where it gets tricky. I first took my anti-static powder and applied it all around the mask to keep my powder from sticking where I didn't want it. I then took my Versamark ink pad and smooshed and smeared it INTO the empty mask space. Thus making the entire shape sticky. I then pulled off the mask, covered the ink with gold embossing powder and heat set it. You are going to want to do this 2 or 3 times to get the desired thickness and constancy for a good impression.  I used Ultra Thick embossing powder so I only had to do this step twice. It was already nice and thick.  Just put the mask back over the embossed area, smear it with more Versamark, add another layer of powder and heat set it. If you use regular embossing powder I recommend doing this step at least 3 times.


Ok, so once you are on your last heating, have your stamp ready and while your embossing powder is nice and hot, you stamp the image (in my case a sentiment) right INTO the hot melted powder.

I rocked my stamp back and forth a bit to be sure I got it nice and impressed. Then I pulled it off. I don't think it will get stuck in there...Haven't had that happen to me yet! This is a fun way to make it look like an old wax seal or you can use it to add little bits of color and textured stamping to your card, layout or planner.


The last thing I did was trim down the card panel and color around the states with some Copic markers. I then added a vellum strip with an additional sentiment and some gold sequins to finish off the look.


This is a really fun technique to try if you like fast moving, hands on crafting! You have to be on your toes to be sure things melt and press in the way you want it. But the fun part is, it creates a different look every time you do it! You never know what you are going to get.

Thanks for stopping in today. I hope you have learned something fun! Also, wasn't last months release so so great?! I know August is going to be just as amazing. Be sure to follow us on Facebook to be in the know for all things Sweet.www.thwww.sweetstampshop.com The releases just keep getting better and better!

Until next time,

xoxo
k


 photo copyright.jpg
envye template.